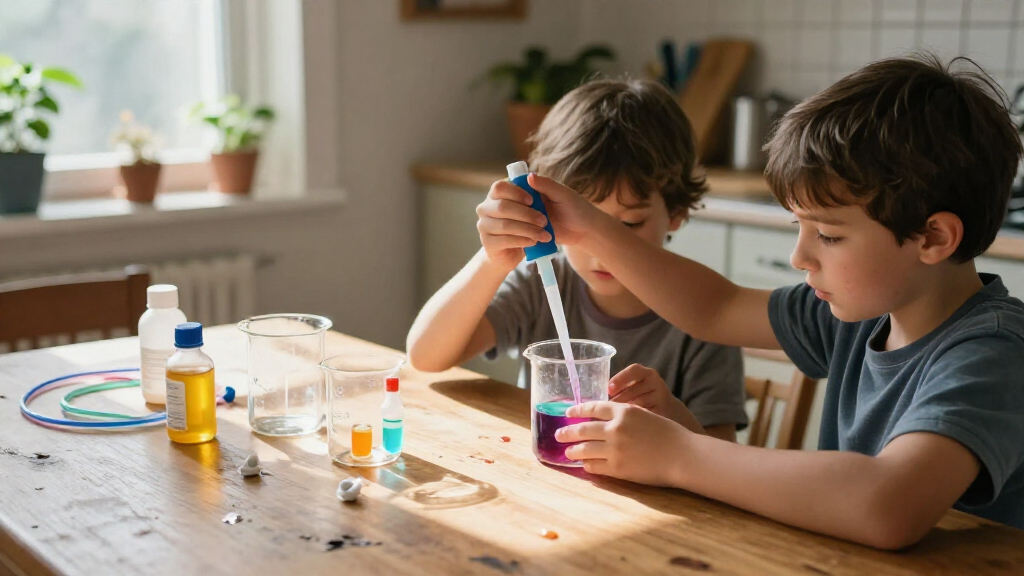
Use this guide to select an educational science kit, prepare for an experiment, and work through it with a child. It is for caregivers, teachers, and other adults supporting beginner learners; no science background is required. Allow 30-90 minutes, including setup and cleanup, and follow the kit’s stated age range and safety instructions.

Prime made for students and young adults
- Fast, free delivery for dorm and study essentials
- Prime Video and Amazon Music included
- Member-only deals

Snap Circuits Explorer SC-100 STEM Electronics Kit, 100+ Projects, Ages 8+
- ✔ Model: SC-100
- ✔ Recommended age: 8 years and up
- ✔ Project count: 100+
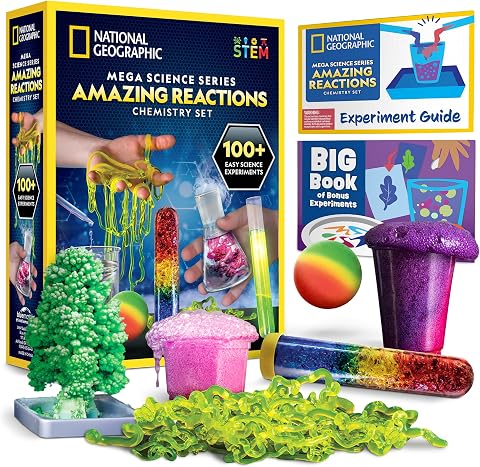
National Geographic Amazing Chemistry Set, 100+ Experiments for Ages 8–12
- ✔ Brand: Blue Marble
- ✔ Age range: 8 years and up
- ✔ Experiments: 15 kit-based experiments and 85 bonus experiments

Learning Resources Fizzy Volcano Preschool Science Lab
- ✔ Brand: Learning Resources
- ✔ Model: LER2895
- ✔ Recommended age: 4–10 years
Difficulty: Beginner | Time: 30-90 minutes, depending on the experiment
What You’ll Need
Tools & Materials:
- Educational science kit with its instructions and all listed components
- Clear, stable work surface
- Safety items specified by the kit, such as goggles or gloves
- Paper and pencil or a notebook for recording observations
- Household supplies listed in the instructions, such as water or a measuring cup
Knowledge:
- Ability to read and follow the kit instructions
- An adult ready to supervise children and handle any restricted materials or tools
Before buying or opening a kit, check its age recommendation, component list, experiment duration, and safety information. Set aside enough uninterrupted time to finish and clean up. Do not substitute materials or combine kit contents with household chemicals unless the instructions explicitly say to.
Snap Circuits Explorer SC-100 STEM Electronics Kit, 100+ Projects, Ages 8+
The SC-100 earns our top ranking because it turns an abstract subject into something children can assemble and observe. Its numbered, color-coded snap components connect on a plastic grid, and the illustrated manual provides a path through more than 100 projects. Building a doorbell or alarm gives a child a concrete reason to follow how a circuit is put together. Since no soldering or tools are needed, the kit puts the focus on connections and outcomes rather than specialized setup.Compared with the National Geographic set, this kit gives children a more repeatable way to explore one subject: circuits. The chemistry set offers a wider range of reaction-based activities, but some depend on household materials and its included supplies cover 15 experiments. Against Fizzy Volcano, the SC-100 suits an older, more construction-oriented learner, while the preschool kit has simpler guided activities and more age-appropriate tools for small hands.Its main limitation is that the project count does not remove the need for batteries, and children still need to follow the manual to get useful results. The product information also gives inconsistent counts for the included components—28 in one description and 29 in another—so we would avoid treating either figure as definitive. This pick makes the most sense for families who want a structured introduction to electronics and can supply batteries.
Pros:
- More than 100 guided circuit projects
- Color-coded, numbered pieces snap together without tools
- Illustrated manual supports step-by-step learning
- Projects introduce basic electronics through observable outcomes
Cons:
- Batteries are required
- Product details differ on whether the kit includes 28 or 29 parts
- The project variety stays within electronics rather than covering multiple science subjects
Best for: Children ages 8 and up who enjoy building, following illustrated instructions and seeing how circuit components produce a result.
Not ideal for: Families seeking chemistry experiments, a battery-free activity or a kit aimed primarily at preschool learners.
Bottom line: We recommend the SC-100 for an engaging, structured first look at circuitry, provided batteries are available.
“We recommend the SC-100 for an engaging, structured first look at circuitry, provided batteries are available.”
National Geographic Amazing Chemistry Set, 100+ Experiments for Ages 8–12
For children who want visible reactions, this set offers the most varied chemistry examples in the lineup. Included materials support 15 kit-based experiments, including growing a crystal tree, making color-changing solutions and producing a bouncy ball. Test tubes, beakers and pipettes help turn those activities into practice with recognizable lab tools. The guide also suggests 85 more experiments using common household items, extending the ideas beyond the materials supplied.That distinction matters when comparing it with the SC-100. Snap Circuits provides a more self-contained sequence of projects within electronics; National Geographic moves between different chemistry activities, but its 100-plus figure includes many suggestions that need supplies from home. Compared with Fizzy Volcano, this set is better suited to children ready for a broader chemistry experience, while the preschool lab offers fewer, more tightly guided experiments aimed at younger learners.The tradeoff is that families should separate included-material experiments from bonus ideas when judging how much activity the box provides on its own. The extra household ingredients add flexibility, but they also mean collecting materials and checking each activity’s requirements. This is a strong choice for curious children ages 8 and up who enjoy reaction-based demonstrations and can work with an adult to prepare activities.
Pros:
- Materials included for 15 hands-on experiments
- Activities include crystal growing and color-changing solutions
- Test tubes, beakers and pipettes introduce familiar lab tools
- Guide adds 85 ideas using common household items
Cons:
- Only 15 experiments use the included kit materials
- The additional experiments require household items
- Families may need to prepare materials before some activities
Best for: Children ages 8 and up who are curious about chemical reactions and enjoy trying a mix of prepared and household-supply experiments.
Not ideal for: Buyers who want every listed experiment to use materials in the box, or children who prefer building circuits to observing reactions.
Bottom line: We recommend this set for chemistry-minded children who value varied reactions and understand that many bonus activities use supplies from home.
“We recommend this set for chemistry-minded children who value varied reactions and understand that many bonus activities use supplies from home.”
Learning Resources Fizzy Volcano Preschool Science Lab
Fizzy Volcano is the most approachable starting point here for a young child who learns by pouring, watching and handling simple tools. Its 10 guided experiments focus on fizzy chemical reactions, and the color lenses, test tube, beaker, funnel and dropper encourage children to observe and take part in each activity. The full-color guide supplies structure, while the kid-sized tools support hands-on practice and fine motor development alongside basic science observation.Unlike the National Geographic set, this lab is organized around a narrower set of reaction activities rather than a longer list that mixes included experiments with household-supply suggestions. Compared with Snap Circuits, it asks for less construction and suits children as young as four, but it does not offer the same range of increasingly varied projects. The kit’s compact lab also stores all its pieces, which can make it easier to keep a young learner’s activity together between sessions.Families still need to provide common household ingredients, so the box is not a complete supply of every experiment material. Its suggested age range extends to 10, but older children may outgrow the activity level sooner than they would with the SC-100 or National Geographic chemistry set. We see it as a focused introduction for early learners, rather than a kit intended to carry a child through several years of rising challenge.
Pros:
- Ten guided experiments introduce fizzy reactions
- Kid-sized tools invite observation and hands-on participation
- Full-color guide provides activity support
- Pieces fit inside the lab for storage
Cons:
- Experiments require common household ingredients
- Older children may find the activities insufficiently challenging
- Focuses on a narrower set of reaction activities than the other kits
Best for: Preschool and early elementary children who benefit from guided, tactile activities and child-sized science tools.
Not ideal for: Older children seeking complex experiments, a large project sequence or an activity kit that includes all ingredients.
Bottom line: We recommend Fizzy Volcano as a welcoming first science kit for younger children, with an adult ready to provide household ingredients.
“We recommend Fizzy Volcano as a welcoming first science kit for younger children, with an adult ready to provide household ingredients.”
As an Amazon Associate we earn from qualifying purchases.
Before You Start
Read the complete experiment instructions before beginning. Check for small parts, sharp tools, heat, liquids, powders, or other materials that call for adult handling. Keep food and drinks away from the workspace, and wash hands after the activity. If the kit is damaged, missing a component needed for safe use, or has unclear safety directions, pause and contact the seller or manufacturer for help.
Step-by-Step Instructions
Step 1: Choose an experiment that fits the learner
Choose a kit whose age range matches the child and whose experiment fits their interests and attention span. Read the activity description and identify what the child will do, such as building a model, observing a reaction, growing something, or testing a question. Assign the child steps they can safely do, and reserve restricted materials or tools for the adult.
Tip: Treat the age range as a safety and complexity guide. A younger child may enjoy watching an experiment but still need an adult to do some parts.
Check: You can describe the experiment in a sentence and identify which parts the child and supervising adult will handle.
Step 2: Check the kit and gather supplies
Open the kit on the work surface and compare its components with the inventory list. Gather only the additional supplies named in the instructions. Inspect containers and tools for cracks, leaks, or damage, and confirm that any required safety gear fits and is ready to use.
Tip: Keep the packaging and instructions nearby in case you need a component name or customer support details.
Check: Every listed component and household supply is present, intact, and within reach.
Step 3: Set up a safe workspace
Clear a stable, well-lit surface and make room for the kit, instructions, and notebook. Cover the surface if the instructions recommend it. Move food, drinks, pets, and unrelated items away. Put on the required safety gear, and place a waste container or cleanup supplies nearby if the instructions call for them.
Tip: Keep the work area away from edges where liquids, parts, or tools could fall.
Check: The workspace is clear, the required safety gear is on hand, and the experiment materials are separated from food and drinks.
Step 4: Read the procedure and assign tasks
Read the instructions from start to finish, including warnings, waiting periods, and disposal directions. Assign who will measure, pour, assemble, or record each part. Explain the safety rules in simple terms, such as not tasting materials or touching eyes during the activity. Begin only after everyone knows what happens next.
Tip: Some experiments need time to set, cool, grow, or dry. Plan for those pauses before you begin.
Check: You know the step order, any waiting time, and which actions require adult supervision.
Step 5: Make a prediction and record the starting conditions
Ask the learner what they think will happen and why. Write the prediction in the notebook, along with the date and any starting measurements the instructions request. Encourage a specific prediction, such as which object will move farther or what color a sample may become, rather than a general guess.
Tip: A prediction does not need to be correct. It gives you something concrete to compare with the result.
Check: The notebook has a prediction and any required starting measurements before the experiment begins.
Step 6: Carry out the experiment in order
Follow one instruction at a time, using the specified amounts and tools. Let the learner complete steps that are suitable for their age, and have the adult handle any restricted task. Pause at checkpoints to confirm the materials and measurements match the instructions. Do not skip ahead or add extra ingredients.
Tip: If a step is unclear, stop and reread it before proceeding. Changing the order or amounts may change the result.
Check: Each step is complete in sequence, with no unplanned substitutions or skipped measurements.
Step 7: Observe and record what happens
Watch the experiment closely and note visible changes, measurements, and timing at the points the instructions specify. Describe observations plainly: for example, “the foam rose above the marked line” instead of “it worked.” Compare the result with the learner’s prediction and note any differences.
Tip: Record what you actually see, even if the result is unexpected or does not match the kit’s example.
Check: The notebook includes the observed result and enough detail to compare it with the prediction.
Step 8: Finish, clean up, and discuss the result
Follow the kit’s directions to dismantle the setup, dispose of materials, and store reusable parts. Wash hands and clean the workspace. Ask the learner what changed, what stayed the same, and what they would test next. Use the kit’s explanation to connect the observations to the science idea it teaches.
Tip: Do not pour or discard leftover materials unless the instructions say how to handle them.
Check: Materials are stored or disposed of as directed, the workspace is clean, and the learner can describe one observation from the experiment.
Common Mistakes to Avoid
- Starting before checking the kit contents or reading all the instructions. — Inventory the components and read the full procedure first so missing supplies or waiting periods do not interrupt the experiment.
- Using different amounts or changing the step order. — Measure as directed and complete each step in sequence; record any accidental change because it may affect the outcome.
- Choosing a kit based only on its topic and overlooking its age range or safety requirements. — Check the age recommendation, warnings, and adult supervision needs before purchase and before opening the kit.
Troubleshooting
Problem: A component or required household supply is missing.
Solution: Pause before starting. Check the packaging and inventory list, then contact the seller or manufacturer for a replacement or clarification. Do not improvise a substitute unless the instructions permit it.
Problem: The experiment looks different from the picture or expected result.
Solution: Check whether the measurements, step order, and waiting time matched the instructions. Record what happened and consult the kit’s explanation or support information. A different result can still be useful evidence.
Problem: The child loses interest during a waiting period.
Solution: Use the wait to sketch the setup, record a measurement, or discuss the prediction. Follow the stated wait time; do not rush a result that depends on it.
Problem: A material spills or gets on skin or eyes.
Solution: Stop the activity and follow the kit’s safety directions and product label. Keep the child away from the spill, use the stated cleanup method, and seek medical or poison-control guidance if the label directs it or irritation occurs.
What Success Looks Like
The experiment has been completed in the instructed order, required safety directions were followed, and observations are recorded. The learner can describe what happened and compare it with their prediction. A result that differs from the kit’s example can still count as a successful activity if the procedure was followed and the observation was recorded.
Next Steps
Store reusable pieces with the instructions, and keep notes with the kit if you plan to repeat the experiment. Try the same activity again after changing one variable only when the kit permits it, and compare the new observations with the first set. For a longer project, such as growing crystals or plants, follow the kit’s schedule for checks and record each change.
Frequently Asked Questions
Can I use a science kit with a child younger than its recommended age?
Choose a kit within the child’s age range when possible. Younger children may be able to observe an activity with an adult, but small parts, tools, or materials can make hands-on participation unsafe. Follow the age guidance and supervision instructions on the kit.
What should I do if the result does not match the instructions?
Record what happened, then check the measurements, order of steps, and required wait time. Follow the kit’s troubleshooting directions or contact its manufacturer if a component seems faulty. Do not repeat the activity with altered amounts unless the instructions allow it.
Can I replace a missing ingredient with something from home?
Only use a substitute if the kit instructions name it as an option. Similar-looking materials can behave differently or create a safety concern. Pause and ask the seller or manufacturer if the instructions do not answer the question.
How should I store an opened science kit?
Follow the storage directions on the packaging. Keep components in their labeled containers, close them securely, and store the kit away from food, heat, and young children if it contains small parts or materials that require restricted access.