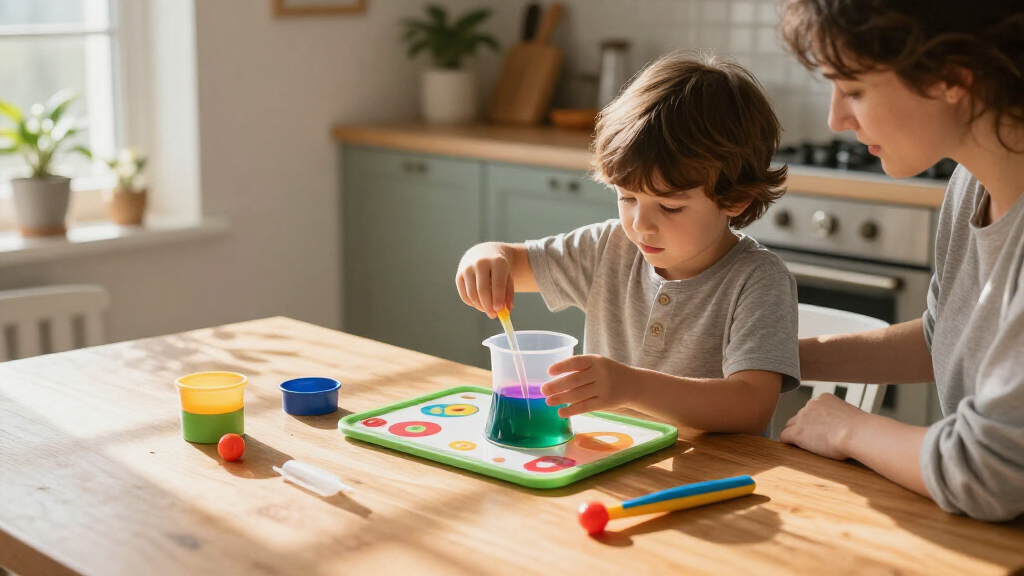

Use this guide to choose an educational science kit for a child, prepare its materials, and lead one activity from setup through cleanup. It is for parents, caregivers, and educators with no specialist science background. Allow 30-60 minutes for the first activity, including preparation and cleanup; check the kit instructions because some projects take longer or need materials to sit between steps.

Get school and study supplies delivered free — and shop member deals
- Fast, free delivery on millions of items
- Access to Prime Big Deal Days deals on October 6–7
- Prime Video, Amazon Music and more included
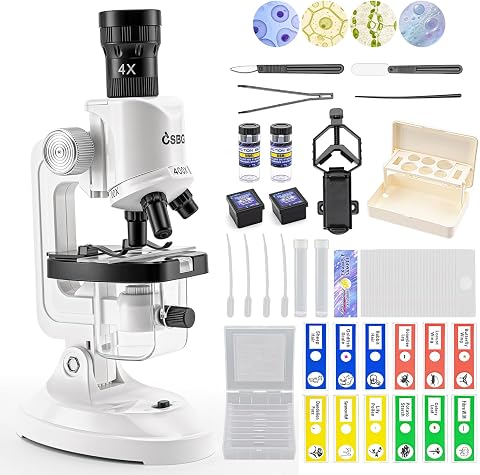
WEACFUS Microscope for Kids, 63-Piece STEM Science Kit
- ✔ Recommended age: 6–12 years
- ✔ Magnification: 100×, 400×, and 1200×
- ✔ Kit contents: Microscope, 13 prepared specimens, 31 blank slides, lab tools, phone holder, storage box
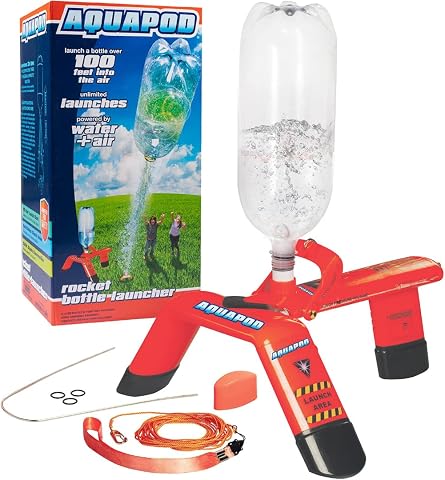
AquaPod Original Rocket Bottle Launcher Kit
- ✔ Brand: Aquapod
- ✔ Age range: 14 years and up
- ✔ Launch height: Up to 100 feet

Kids Borescope 1000x Handheld Digital Microscope with 4K Camera
- ✔ Optical magnification: 200×–1000×
- ✔ Digital zoom: 1×–4×
- ✔ Camera: 4K HD, 2MP
Difficulty: Beginner | Time: 30-60 minutes for the first activity; kit setup and later activities vary
What You’ll Need
Tools & Materials:
- The kit and its instruction booklet
- A clear, stable work surface
- Household materials listed in the instructions
- Paper and a pencil for observations
- Protective equipment specified by the kit, such as safety glasses or gloves
Knowledge:
- Read and follow written instructions
- Help a child measure, observe, and clean up
- Check the child’s age and needs against the kit guidance
Review the full activity before opening materials. Set aside the time it needs, including any waiting period. Do not substitute chemicals or mix materials from different activities. An adult should handle steps the manufacturer marks for adult supervision or that involve heat, sharp tools, small parts, or substances that should not touch skin or go near the mouth.
WEACFUS Microscope for Kids, 63-Piece STEM Science Kit
The WEACFUS microscope is our best all-around choice because it gives children several ways to begin exploring without centering the activity on a single demonstration. Its 100×, 400×, and 1200× magnification settings allow a child to compare what different levels reveal, while 13 prepared specimens provide an immediate first look. The 31 blank slides and supplied tools then make room for more open-ended investigation. That progression makes the kit a stronger fit for repeated learning than AquaPod, whose main activity is launching a bottle and discussing the forces involved.Its age guidance of 6–12 years also makes it the most clearly positioned option for younger learners in this group. The portable design can move between a home table, classroom, or outdoor setting, and the phone holder offers another way to share what is being examined. Compared with the Kids Borescope, this kit emphasizes traditional microscope work and a larger selection of prepared and blank slides rather than a built-in screen and camera. That distinction favors children who want to handle specimens and tools directly.There are practical limits: it needs two AA batteries, not included, and very high magnification is only useful when a child can prepare and focus a suitable specimen. Families looking for easy photo and video viewing may prefer the Borescope’s screen. Still, as an entry point to observing, comparing, and asking questions about small details, WEACFUS offers the broadest learning path of the three.
Pros:
- Three magnification settings support comparisons between views
- Prepared and blank slides encourage both guided and open-ended observation
- Includes tweezers, dropper, scalpel, phone holder, and storage box
- Portable for home, classroom, or outdoor use
Cons:
- Two AA batteries are required and not included
- Does not include the Borescope’s built-in viewing screen and camera
Best for: Children ages 6–12 who enjoy examining specimens and want slides and basic lab tools for ongoing exploration.
Not ideal for: Families who want a built-in digital display or children chiefly interested in outdoor, large-scale experiments.
Bottom line: Choose WEACFUS for the most flexible microscope-based introduction to observing and investigating specimens.
“Choose WEACFUS for the most flexible microscope-based introduction to observing and investigating specimens.”
AquaPod Original Rocket Bottle Launcher Kit
AquaPod turns an abstract idea—compressed air creating force—into an event children can see from across a yard. The launcher uses a standard 2-liter bottle and can send it up to 100 feet, making this the most active and dramatic science activity in the lineup. It is our pick for families who want a shared outdoor project and a natural opening to discuss pressure, motion, and variables such as launch angle. Compared with either microscope, it makes the science visible at a distance rather than through close observation.The one-piece design is portable, and the built-in pressure release safety valve is a useful part of its design. But the kit contains only the launcher: a bicycle pump and bottle are required and not included. That adds setup before the experiment can begin, and the activity needs an outdoor location with enough clear space. The listed age range is 14 years and up, so it is less clearly suited to younger children than the WEACFUS microscope.AquaPod ranks behind WEACFUS because it offers a narrower learning format and depends on the right place and supplies, even though its physics demonstration is distinctive. Compared with the Kids Borescope, it is also less suited to quiet, repeatable exploration at a desk. Choose it when the goal is an energetic group activity and the adults can manage setup and the launch area.
Pros:
- Bottle launches can reach up to 100 feet
- Makes pressure and motion visible through an active experiment
- Portable one-piece launcher design
- Built-in pressure release safety valve
Cons:
- Bicycle pump and 2-liter bottle are not included
- For outdoor use only and requires clear launch space
- Listed age range is 14 years and up
Best for: Families with older children who want an outdoor activity for exploring pressure and motion together.
Not ideal for: Younger children, indoor learners, or households without a bicycle pump and suitable open outdoor space.
Bottom line: Pick AquaPod when an outdoor, high-energy physics demonstration matters more than broad or desk-based exploration.
“Pick AquaPod when an outdoor, high-energy physics demonstration matters more than broad or desk-based exploration.”
Kids Borescope 1000x Handheld Digital Microscope with 4K Camera
Kids Borescope is the specialist pick for children who want to see magnified details on a screen. Its 2.4-inch IPS display, manual focus, and built-in LEDs make it feel more like a handheld viewing device than the traditional slide-centered WEACFUS. A child can capture photos and video while investigating, and the rechargeable battery avoids the separate AA battery requirement of its competitor. With 12 prepared slides included, there is still a starting collection for guided viewing.The listed 200×–1000× optical magnification and 1×–4× digital zoom offer a broad range, but buyers should distinguish optical magnification from digital zoom when setting expectations. The 4K camera specification may appeal to families interested in image capture, yet the device has a 2MP camera and modest onboard storage. Photos can be deleted but not downloaded from the device, and video recording requires a microSD card sold separately. Those limits matter more here than on WEACFUS, which is designed around direct microscope observation rather than retaining media.Against AquaPod, the Borescope is easier to use indoors and supports a quieter, repeatable activity; against WEACFUS, it gives up a larger set of slides and tools in favor of its screen and camera. Its compact size and rechargeable battery are useful for moving between rooms or taking it along, though up to two hours of battery life means it may need recharging during longer sessions. Choose it when immediate on-device viewing is the feature that will sustain a child’s interest.
Pros:
- Built-in color screen supports direct viewing without a separate phone
- Manual focus and adjustable LED lighting help adapt the image
- Rechargeable battery and compact handheld format
- Includes 12 prepared slides
Cons:
- Video recording requires a microSD card, sold separately
- Photos cannot be downloaded from the device
- Battery life is up to two hours
Best for: Children who prefer viewing specimens on a built-in screen and want to capture images during short investigations.
Not ideal for: Families who need easy file transfer, longer battery sessions, or a large collection of slides and hands-on lab tools.
Bottom line: Choose the Borescope for screen-based specimen viewing, provided its limited image transfer and separate video storage fit your needs.
“Choose the Borescope for screen-based specimen viewing, provided its limited image transfer and separate video storage fit your needs.”
As an Amazon Associate we earn from qualifying purchases.
Before You Start
Choose one activity to complete rather than opening every package in the kit. Check warnings, age guidance, and disposal instructions on both the kit and its materials. Keep food and drinks away from the work area, and wash hands after the activity. If a child has allergies, sensory needs, or difficulty following safety directions, review the materials and adapt the workspace before starting. Stop if a container is damaged, a material is unlabeled, or the instructions are missing.
Step-by-Step Instructions
Step 1: Choose a kit that fits the child
Match the kit’s stated age range to the child’s ability to follow directions, handle small parts, and wait for results. Pick a subject the child already finds interesting, such as plants, magnets, weather, or the body. Read the product description and activity list to see whether the kit includes everything needed or expects household supplies. Prefer a kit with clear instructions, labeled materials, and more than one activity if you want repeated use.
Tip:Age labels are a starting point, not a substitute for checking small-part and supervision warnings. A younger child can take part in observation and prediction while an adult handles more complex steps.
Check: You can name an activity the child wants to try, explain what extra materials it needs, and identify the supervision level before buying or opening the kit.
Step 2: Read the activity and check the materials
Select one project and read every instruction before beginning. Lay out the listed materials and compare them with the booklet’s inventory. Check that containers are sealed, labels are readable, and household supplies are available. Note any wait times, outdoor requirements, or steps that must happen in a particular order. If something is missing or damaged, pause and contact the kit maker or choose another complete activity.
Tip:Do not guess which unlabeled powder or liquid belongs to a step. Keep each item with its label and original container.
Check: The materials for the chosen activity are present and in usable condition, and you know the full sequence and timing.
Step 3: Set up a safe work area
Clear a stable table with enough room for the child to work without reaching across materials. Cover the surface if the kit recommends it, and place a waste container and paper towels nearby. Move food, drinks, pets, and unrelated objects away. Put on the protective equipment listed in the instructions. Keep kit materials in their containers until the relevant step, and have an adult take charge of any restricted equipment.
Tip:Use a well-lit space where an adult can see the work. Avoid working near a stove, sink full of dishes, or other activity that could distract the child.
Check: The work surface is clear, the required protection is ready, and the adult and child know which steps the adult will handle.
Step 4: Invite the child to make a prediction
Describe the question the activity explores using the kit’s wording. Ask the child what they think will happen and why. Record a short prediction in a notebook or on a sheet of paper before starting. Accept a simple answer, drawing, or dictated sentence; the goal is to make a guess that can be compared with the result, not to get the right answer in advance.
Tip:Ask an open question such as “What do you think will change?” Avoid suggesting the result before the child has made a prediction.
Check: A prediction is recorded before the materials are combined or the observation begins.
Step 5: Follow the instructions one step at a time
Read one direction aloud, let the child complete the parts that are safe for them, and check the setup before moving on. Measure with the tools and amounts specified; do not add extra material to make a result happen faster. Keep parts in the order shown, and use only the containers assigned to the activity. If the instructions call for adult handling, complete that action yourself while explaining what the child should watch.
Tip:Do not taste, smell closely, or touch materials unless the instructions explicitly say that action is safe. Never mix leftover substances or reuse a container for food.
Check: Each step has been completed in sequence, the quantities match the directions, and no unexpected materials have been added.
Step 6: Observe and record what happens
Pause at the observation points named in the booklet. Ask the child to describe visible changes in color, shape, movement, temperature, or timing, depending on the activity. Write down the observations or invite the child to draw them. Separate what they saw from what they think caused it. If the result develops over time, note when to check again and keep the setup where it can be monitored safely.
Tip:Use specific prompts such as “What looks different now?” or “How long did that take?” rather than asking only whether the experiment worked.
Check: The child has at least one observation recorded, and the notes describe what happened rather than only whether the outcome was expected.
Step 7: Compare the result with the prediction
Review the prediction and observations together. Ask whether the result matched, partly matched, or differed from the prediction. Use the explanation in the kit booklet to connect the result to the science idea, then invite the child to explain it in their own words. If the result was unclear, describe that honestly and identify one thing to check before trying again.
Tip:A surprising or inconclusive result can still be useful. Avoid changing the notes to make them fit the booklet’s expected outcome.
Check: The child can point to an observation and give a simple explanation, or say what remains uncertain.
Step 8: Clean up and store the kit
Follow the booklet and package labels for disposal; do not pour materials down a drain unless the directions allow it. Have an adult handle any waste requiring special disposal. Clean reusable tools as instructed, dry them when needed, and return materials to their labeled containers. Wipe the work surface, remove protective equipment, and wash hands. Store the kit closed, dry, and out of reach of children when not in use.
Tip:Keep the instructions with the kit so the next activity has its safety and disposal information.
Check: The materials and waste have been handled according to the directions, the work area is clean, and the kit is stored safely.
Common Mistakes to Avoid
- Choosing a kit based only on its age label or exciting packaging. — Read the activity list, warnings, supervision guidance, and supply requirements. Match the task to the child’s ability and interest.
- Starting before checking every step and material. — Read the complete activity first and lay out its materials. This helps prevent a rushed pause after materials have been opened or combined.
- Changing amounts or mixing leftover materials to get a stronger result. — Follow the listed quantities and keep activities separate. If the result differs from expectations, record it and check the setup before repeating.
- Treating a child’s prediction as a test they can pass or fail. — Record the prediction without judgment and focus on comparing it with observations. The activity is about finding out what happens.
Troubleshooting
Problem: A listed household supply or kit component is missing.
Solution: Pause before starting. Check the package and storage area, then contact the kit maker about a missing component. Use a substitute only if the instructions or manufacturer explicitly approve it.
Problem: The activity does not produce the result shown in the booklet.
Solution: Check the sequence, measurements, material labels, and timing against the instructions. Record what happened. Repeat only if the directions allow it and the materials remain safe to use.
Problem: The child loses interest while waiting for a result.
Solution: Set a timer for the next observation point and give the child a related task, such as drawing the setup or writing down the prediction. Keep the experiment in a safe place during the wait.
Problem: A material spills, irritates skin, or gets into eyes.
Solution: Stop the activity and follow the kit label’s first-aid directions. Get adult help immediately; rinse skin or eyes only as directed on the label. Contact local poison control or emergency services if the label advises it or symptoms are serious.
What Success Looks Like
The activity is complete when the child has followed the kit directions with appropriate adult supervision, recorded an observation, compared it with a prediction, and described what the result may mean. The work area and materials are cleaned up according to the instructions. A result that differs from the booklet can still meet these criteria if it is recorded accurately and handled safely.
Next Steps
Keep the child’s notes with the kit or photograph them for later comparison. Choose another activity that builds on the same subject, or repeat the experiment only when its instructions permit and you can keep the conditions consistent. Replace used materials with manufacturer-approved supplies, and discard expired, damaged, or unlabeled items according to their directions. Ask a teacher, kit maker, or qualified professional for help if an activity’s safety or result is unclear.
Frequently Asked Questions
Can a younger child use a kit labeled for older children?
Only if an adult checks the age, small-part, material, and supervision warnings and can safely manage the required steps. Let the child take part in prediction and observation while the adult handles tasks beyond the child’s ability.
What should I do if the kit’s result does not match the example?
Compare your sequence, measurements, materials, and timing with the directions. Record the result as it happened. Do not add more material or change the procedure unless the instructions say to do so.
Can I use household ingredients instead of kit materials?
Use household ingredients only when the activity instructions list them or the kit maker approves them. Similar-looking materials may behave differently, and unapproved substitutions can affect safety and results.
How can I make the activity educational without giving a lecture?
Ask the child to predict, describe what they observe, and compare the result with their guess. Use the booklet’s explanation to answer follow-up questions in plain language, and let the child explain the result in their own words.
Halloween Picks
halloween
As an affiliate, we earn on qualifying purchases.

![Competitive Programmer's Handbook (2018) [Pdf]](https://fatsil.org/wp-content/uploads/2026/10/competitive-programmer-s-handbook-2018-pdf-featured-260x140.jpg)