
TL;DR
A closet can be a surprisingly effective vocal booth if treated properly and ventilated. The biggest gains come from strategic placement, sealing gaps, and adding absorption, rather than relying solely on foam panels. Moving the rig out of earshot remains the most effective noise reduction trick.
Ever wondered if your tiny closet could turn into a decent recording studio? The answer is yes — if you understand how sound works and how to treat that cramped space. Most people jump straight to foam panels or blankets, but the real magic happens with placement and sealing first.
This guide unpacks how to turn a closet into a quiet, effective rig station. You’ll learn why the right placement beats fancy gear, how to treat reflections, and the secret to keeping your PC cool without turning it into a furnace. Ready to make that closet sing?
Acoustic dampening
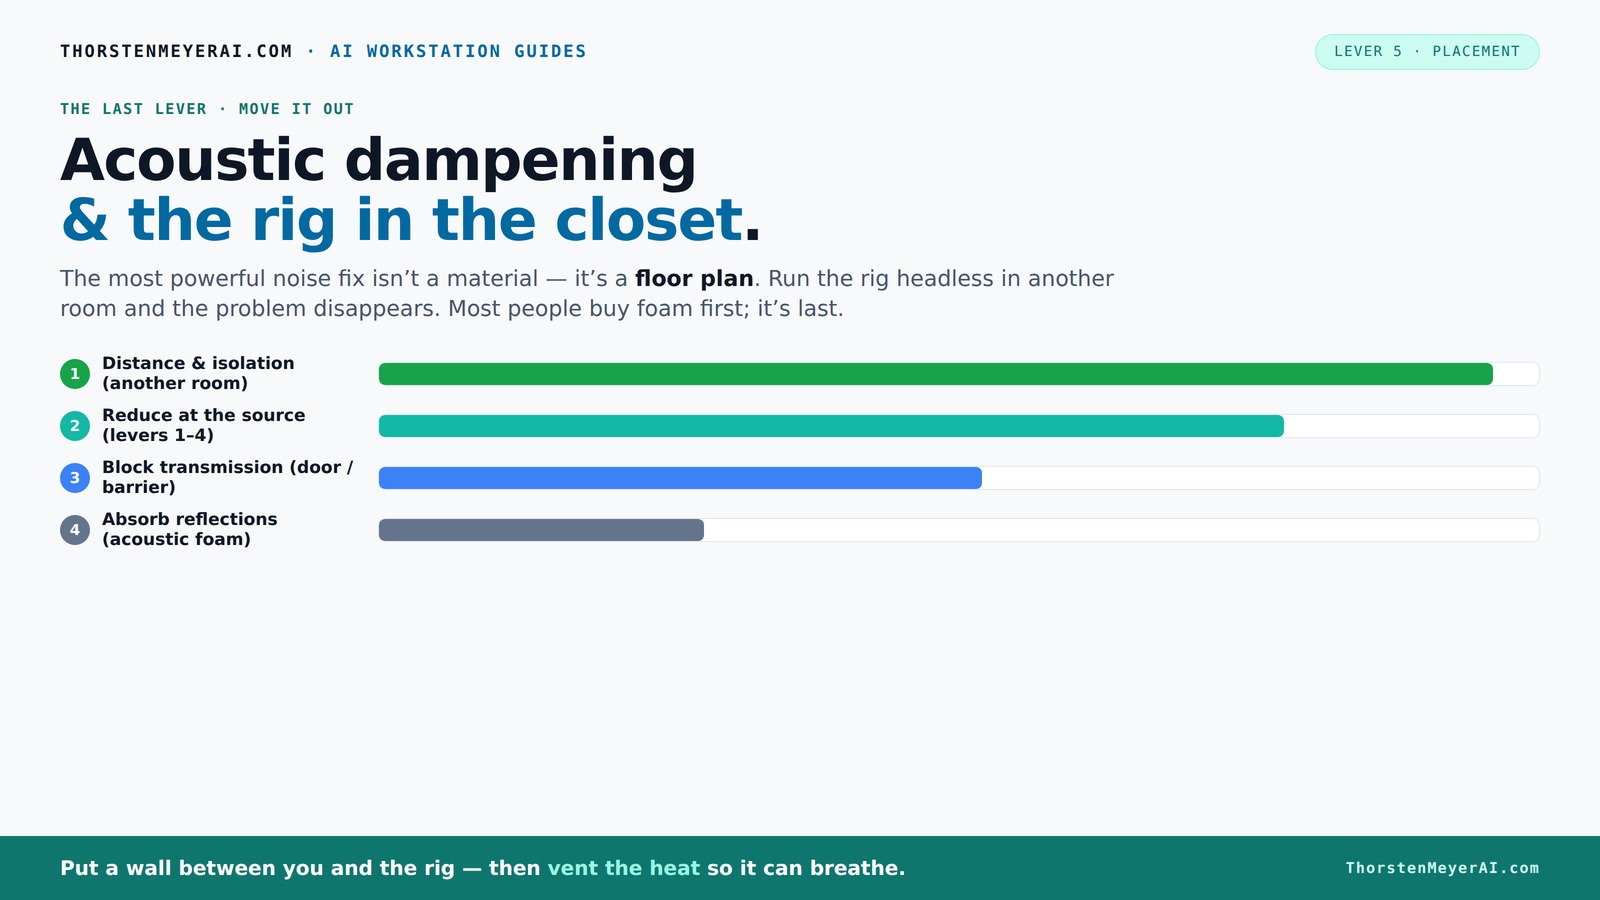
& the rig in the closet.
The most powerful noise fix isn’t a material — it’s a floor plan. A rig you can’t hear because it’s in another room beats any amount of foam. Tap the approaches in Part 1 to see what actually works.
(another room)
(levers 1–4)
(door / barrier)
(acoustic foam)
Contain the noise, not the heat
Key Takeaways
- Moving your rig into another room is the most effective way to reduce noise without complex treatment.
- Seal gaps around the closet door with weatherstripping or blankets to prevent sound leaks.
- Prioritize treating reflection points—especially behind the mic and in corners—to tame echo and bass buildup.
- Ensure your closet has proper ventilation—active exhaust or venting—to avoid overheating your hardware.
- Layer dense, layered materials like blankets and thick panels for best internal absorption and reflection control.

MAXTID Large Door Draft Stopper for Bottom of Doors 36” Under Door Sweep Noise Blocker Black Gap Stoppers Adjustable Doors Seal Sweep Guard Draft, Window Breeze Stoppers, Home Essentials Gadgets
- Large Foam Diameter: 2 inches for better coverage
- Effective Insulation: Blocks cold air, noise, light, and odors
- Secure and Non-Damaging: Stays in place without damaging doors
As an affiliate, we earn on qualifying purchases.
As an affiliate, we earn on qualifying purchases.
Why Moving Your Rig Is the Best Noise Fix
Moving your noisy rig out of your workspace is the most effective way to cut down sound. Think of it like putting a loud neighbor's music in another room. When the source is far away, your ears no longer catch every hum and whirr.
Picture your AI workstation in a closet at the end of the hall, while you work peacefully in your office. This simple step often beats buying foam or installing barriers. It’s about distance and smart placement.
For AI workstations, the setup is perfect: you SSH or remote into the machine. No need for it to be next to you. Just ensure a wired connection and good ventilation, and you’re golden.
The "Rig in the Closet" Setup — The Good and the Caveat
Placing a noisy, heat-generating rig inside a closet works wonders for sound. It’s like hiding a lawnmower in a shed. But there’s a catch: heat. A sealed closet traps warmth, risking overheating and throttling your hardware.
To make this work, you need active ventilation: a gentle exhaust fan or vents that let hot air escape. Many DIY creators hang blankets over the door or install vented panels to balance soundproofing with airflow. You’ll find purpose-built soundproof cabinets that do this for you, combining absorption with temperature control. Check out this guide for detailed tips on cooling and noise reduction in closet setups.
Check out this guide for detailed tips on cooling and noise reduction in closet setups.
Sound Absorption vs. Soundproofing — What’s the Difference?
Sound absorption and soundproofing are often mixed up, but they serve different goals. Absorption reduces echoes and reflections inside a space, while soundproofing blocks sound from escaping or entering.
In a closet, absorption is about softening reflections—think of thick blankets or layered panels—while soundproofing involves sealing gaps and adding dense barriers. Foam is great for reducing echo but won’t stop noise from leaking out.
Understanding this distinction is crucial because it helps you prioritize your efforts. For instance, if you only treat with foam panels, you might still have sound leaks, defeating the purpose of your effort. Conversely, sealing gaps without addressing internal reflections can leave your recordings echoey and unprofessional. Ideally, you want a combination: absorb inside to improve sound quality, and block leaks to prevent noise from disturbing others or escaping your space.
Where to Place Reflection & Sound Absorption Materials
The most impactful spot for acoustic treatment is the wall behind your microphone and along the direct sound path. Think of it as the first obstacle sound waves hit, so absorbing reflections there makes a big difference.
In a small closet, treat the walls, ceiling, and corners where low frequencies build up. Use dense, layered materials like thick blankets, acoustic panels, or even moving blankets. Cover as much surface as possible, especially reflective surfaces like the back wall.
For example, hang a thick blanket over the closet door or install foam panels at reflection points. This helps prevent that boxy, echoey sound so common in tiny rooms.
Additionally, consider placing absorption materials at the first reflection points—these are typically the surfaces directly opposite your microphone or where sound waves bounce before reaching your ears. Using hand-held mirrors can help identify these points easily. Proper placement ensures that internal reflections are minimized at the source, resulting in clearer recordings and a more natural sound.
Sealing the Closet Door — The Missing Piece
Sound leaks through gaps around the closet door, making your efforts useless if you don’t seal them. Weatherstripping, acoustic door sweeps, or hanging a thick blanket over the door can block most of the leaks.
Imagine the difference: sealing a door can cut sound transmission by 40-60%. For tight seals, use weatherstripping tape or door seals designed for soundproofing. For a quick fix, hang a moving blanket or quilt across the door.
Remember, the goal is to create a barrier that stops sound from sneaking out or in, making your acoustic treatment more effective. Be meticulous about sealing all gaps, including around hinges and handles, since even small openings can significantly reduce your soundproofing effectiveness. The more airtight your space, the better your internal treatments will perform, and the quieter your recordings will be.
Low-End Buildup & Corners — Tackling Bass in Tiny Spaces
Small closets often turn into bass traps, with low frequencies bouncing around and creating a muddy, boomy sound. This low-end buildup is common because parallel walls reflect bass waves, forming standing waves.
To combat this, install bass traps in the corners, where they absorb the low frequencies. You can buy dedicated bass trap panels or stack thick blankets or dense foam in corners. For example, placing a bass trap behind your mic or in the closet’s corners can reduce muddiness significantly.
Understanding why this happens is key: low frequencies have longer wavelengths that tend to bounce between parallel surfaces, causing resonances and uneven sound. Installing bass traps disrupts these standing waves, resulting in tighter, more balanced bass. Ignoring low-end issues can leave recordings sounding hollow or boomy, especially when listening on larger speakers or headphones.
For best results, treat multiple corners and consider using broadband bass traps that absorb across a wide range of low frequencies. This proactive approach ensures your recordings are clear and well-balanced, even in small, reflective spaces.
Treat the Ceiling & Floor for Clearer Vocals
In tiny closets, reflections bounce from the ceiling and floor, adding boxiness to recordings. Treating these surfaces is often overlooked but can dramatically improve sound clarity.
Use acoustic panels or blankets overhead to tame early reflections from the ceiling. On the floor, a thick rug or carpet helps absorb slap echoes, especially if the floor is hard surface like wood or tile.
For example, hanging a quilt or thick blanket from the ceiling or placing a rug in front of your mic can soften harsh reflections, making vocals sound more natural and less trapped in a box. This not only improves clarity but also reduces the perception of a 'boxed-in' sound, giving your recordings more presence and warmth.
Budget-Friendly Tips for Temporary & Permanent Closet Rigs
If you’re on a budget, quick fixes like hanging blankets or using thick towels can make a noticeable difference. For a more permanent, professional setup, consider installing dense panels, bass traps, and sealing gaps thoroughly.
Layering blankets, using removable acoustic foam panels, and sealing gaps with weatherstripping are all inexpensive ways to improve your space. For example, hanging a moving blanket over the door and lining the walls with foam can turn a noisy closet into a decent vocal booth without breaking the bank.
When you’re ready to go permanent, invest in purpose-built soundproof panels and proper ventilation to keep your gear cool and quiet. The key is understanding that each layer of treatment adds to the overall effectiveness—no single fix is enough, but combined, they create a substantial difference.
Frequently Asked Questions
Is a closet actually good for recording vocals?
Yes. Small, enclosed spaces like closets can act as makeshift vocal booths, especially when treated with absorption materials. They reduce reflections and echo, giving you cleaner recordings, provided you seal gaps and control low-end buildup.What’s the difference between acoustic treatment and soundproofing?
Acoustic treatment reduces reflections and echo inside a space, making recordings clearer. Soundproofing blocks sound from escaping or entering, which is harder in small spaces but essential if you want to prevent noise leaks.Where should I put the mic in a closet booth?
Place the mic away from reflective surfaces and close to the sound source. The best position is often slightly in front of a treated wall, facing the main reflection points, to capture the clearest sound.How much wall coverage do I need?
Covering about 70-100% of reflective surfaces, especially the back wall and ceiling, dramatically reduces echo. Focus on treating reflection points and corners for the biggest impact.Do I need bass traps in a tiny closet?
Yes, bass traps in the corners can help prevent low-frequency muddiness, which is common in small, parallel-walled spaces. Use dense foam or dedicated bass trapping panels for best results.Conclusion
Your closet can become a surprisingly good recording space — if you treat it smartly. Focus on placement, sealing gaps, and layering absorption materials. And remember, the biggest noise reduction often comes from simply moving your rig away from your workspace.
Imagine a quiet, cozy corner where your voice sounds clear and natural, free from echoes and background hum. With a little effort, that space is within reach. So, start with the placement first, then layer in absorption, and keep your hardware cool. Your perfect closet studio is closer than you think.